Pique
by Automattic
Give your business a little pep with Pique! Designed for one-page scrolling websites, Pique is perfect for small businesses like cafés, bakeries, hair salons, and shops.
Let the Pique WordPress restaurant theme inspire you to build a website for your coffee shop, diner, or sports bar. A single-page layout keeps this focused, while the ability to customize it with your own images, logo, and more lets you express your brand and ethos.
You’ll add panels to its one-page layout that features all the most important information about your business – hours, menu, location — so website visitors can quickly find everything they need to know.
Use Pique to showcase your baristas or bartenders, your most popular beverages, or special events at your business. Whether you need a website for a craft brewery or a coffeehouse, this (free!) restaurant website template has all the ingredients you need.


Single posts and pages use Featured Images in the header, and also feature a sidebar for additional widget content.
Setting Up Your Front Page
When you first activate Pique, it will display your posts on the front page in a traditional blog format.
To create a front page with content panels, as seen in the site demo, follow these steps to set up a Static Front Page:
- Publish two pages – one to act as your Front page, and another for your Posts, if you would like to add a blog to your site.
- Navigate to Customize → Static Front Page and set “Front page displays” to “A static page.”
- Select one of the pages you created in step one to display as the “Front page,” and choose the second page as “Posts page” to display your blog posts (if applicable).
Front Page Content
On its own, the page you assigned as your Static Front Page will display a single panel with a full-screen featured image, your site logo and/or title, your site menu, and your page content.

Front page content
The large, italicized heading that appears just below your menu comes from the first line(s) of text entered on the page you assigned as your front page.
If you add a line break after your heading (by hitting ‘enter’ or ‘return’ on your keyboard), any additional text on your front page will be formatted in the normal paragraph font and size.
To call out certain words in the headline in another color, simply italicize those words in your page editor. The color of the emphasized words will vary, depending on the color palette you choose in Customize → Colors & Backgrounds.
Adding Panels
To get the rest of your front page set up, you’ll want to add some more panels. Each «panel» is created from a standard page on your site.

To add additional panels to your Front page, follow these steps:
- Create or edit a page.
- To set a background image for that panel, assign a Featured Image to the page. The ideal size for these images is at least 1400 pixels wide and 1000 pixels tall, since it stretches the full width of your site.
- Publish your page.
- Navigate to Customize → Theme Options. From the drop-down, select the page you’d like to appear in the panel.
You can also adjust the background color, and the opacity of your featured image on top of that color, allowing you fine-tuned control over your page’s appearance.
The footer widget area uses your Custom Header Image as its background, which can be set in Customize → Header Image.
Using Page Templates
Pique comes with several page templates built-in, designed to give you flexibility in arranging your content. To specify a page template, select it from the Page Options area, as you edit that page.
Grid Template
The Grid Page template is designed to show child pages in a grid format — three in a row. This is useful for showcasing your services or featuring your staff.

To get started, first create or edit a page, and assign it the Grid Page template under Page Options. The title and content of this page (if any) will be displayed above the grid.
To add an item to the grid, create a second page and set its parent page as the grid page you just created. Be sure to set a Featured Image for each child page if you want an image to show up inside the grid. Repeat these steps for every item you want to display in the grid.
Note: The Grid Template will display a maximum of 12 pages.
Full-Width Template
The Full-Width template gives you more space for your content. It’s the perfect way to showcase a gallery of images or a video.
Testimonials Template
Pique features testimonials in two ways:
- The dedicated testimonial archive page displays all testimonials in reverse chronological order, with the newest displayed first.
- The Testimonials page template, that allows you to display testimonials as a panel on your Front Page.
This panel will show two testimonials, selected at random. When the page is refreshed, two different testimonials will display, allowing your customers to see a rotating display of your testimonials.

To add a testimonial, go to My Site → Testimonials → Add. Testimonials are composed of the testimonial text, the name of the customer (added as testimonial title), and an image or logo, which can be added as a Featured Image.
You may wish to display supplementary information about your testimonial author, like their job title or company. Pique can show this information with a different formatting so it’s visually distinct from the name. To make use of this, add <em> and </em> tags around your supplementary text in the testimonial’s title field, for example:
Groucho Marx, <em>Marx Brother and general mischief-maker</em>
Where is the Testimonial archive page?
Let’s say you have a WordPress.com site at:
The URL of the testimonial archive page will be:
https://piquedemo.wordpress.com/testimonial/
Displaying your recent blog posts
You can show a panel of the three most recent blog posts by adding the page you selected as your “Posts page” as a panel.

Special Formatting
Using icons
Pique comes packaged with the Font Awesome icon library so that you have easy access to hundreds of icons. To use an icon, find the icon you’re looking for on Font Awesome’s website and copy the code provided.
![]()
For example, to show the icons shown here, you’d use the following codes:
<i class="fa fa-phone"></i>
<i class="fa fa-location-arrow"></i><i class="fa fa-calendar"></i>
<i class="fa fa-envelope-o"></i><i class="fa fa-facebook-official"></i>To add icons, open any page or post for editing. Switch to the HTML tab in your editor and add the FontAwesome code where you’d like the icon to appear.
Call-to-action buttons

You can add call-to-action buttons to your site by using the following code in HTML view. Change the # to your own link, and the button text to whatever you prefer:
<a href="#" class="button">Learn more</a>
<a href="#" class="minimal button">Try it out</a>
Adding a background to panel text
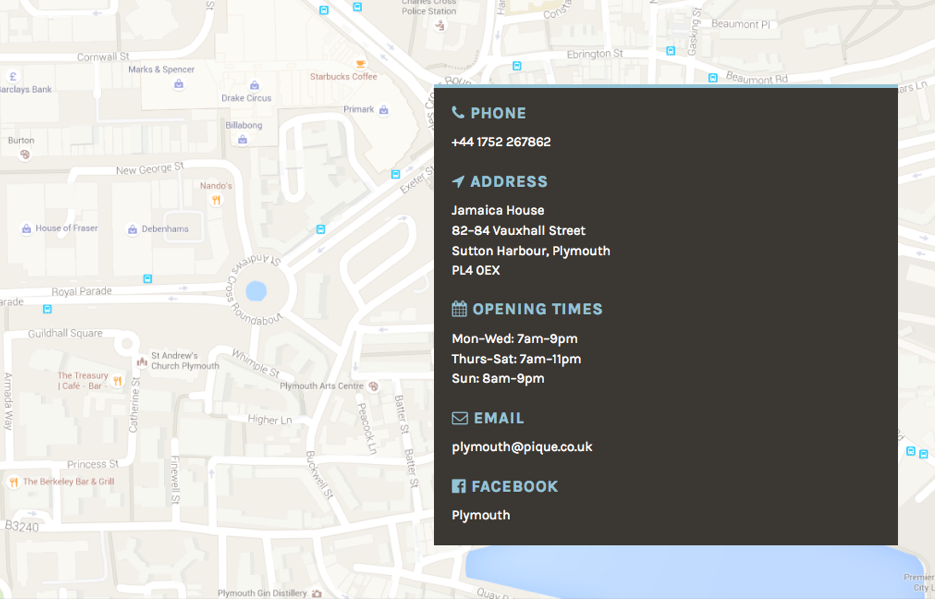
Sometimes, you may want to show a smaller area of content with a solid background. This is especially useful if you’d like to show a map in the background, with your content information overlaid on top.
You can create a solid overlay in your page’s HTML editor by adding a <div> with two special classes:
<div class="overlay alignright">
This overlay will be aligned to the right-hand side of its panel.
You can add any content you'd like here.
</div>
This works particularly nicely when combined with a Full-Width Template.
Site Logo
Your logo is an important part of your brand identity, so Pique supports a Site Logo. To add your logo, go to Customize → Site Identity. Your logo will appear above the site navigation on every page.
Custom Menus
Pique allows you to have two Custom Menus: one in the theme’s header and one in the footer.
Dynamic Menu
Your front page can automatically show a menu with «jump» links, that will scroll down to your various panels. You can do this by navigating to Customize → Theme Options → Menu Settings and checking «Add an anchor menu to the front page..» Pique will then create that menu, for the front page only, that will link to each panel.
Primary Menu

You can also create a Custom Menu that will display at the top of your site’s pages. If you selected the Dynamic Menu, as described in the previous section, the Primary Menu will appear on all pages except the front page. The Primary Menu will stick to the top for screen widths larger than 768 pixels (tablet size).
Secondary Menu
Secondary menu with text links
Social links automatically display as icons.
The secondary menu has been designed to provide quick links for your visitors. It only supports top-level links—if you have a child menu item, it won’t be displayed. This secondary menu will be displayed in the footer of your site. It’s a good place to put Terms & Conditions and a Privacy Policy, or quick links to important pages on your site. Alternatively, you could use this area to add your social media links.
Social Media Links
Pique doesn’t have a specific menu just for social media links, but it offers two excellent spots to put them. You can use a Social Media Icons Widget in one of the three footer widget areas, or you can use the secondary menu for your social media links.
Quick Specs (all measurements in pixels)
- The main column width is up to
857. - The optional sidebar is up to
408wide. - The recommended Featured Image size is at least
1400by1000. The theme will scale and crop the images depending on the page and device size. - The recommended Custom Header image size is at least
1400by400. - The Site Logo is a maximum of
100high.
Keywords
food, restaurant, bar, cafe, lifestyle, bakery, hotel, grocery, market
This theme is available for download to be used on your WordPress self-hosted installation.
Download